What to Expect During a Home Addition: From Design to Move-In

Here's the honest answer: a home addition takes longer than you think, costs more than the number in your head, and involves a sequence of phases most contractors never bother to explain. Plan on 12-18 months from your first architect meeting to your final inspection.
Design runs 3-6 months. Permitting in St. Pete takes 1-2 months on a good day — longer if you're in a flood zone or historic district. Construction is roughly 6 months. This guide walks you through every phase so nothing catches you off guard.
This is written for the St. Pete homeowner planning a $200,000-$400,000 addition — whether you're a long-time Old Northeast or Snell Isle resident expanding rather than relocating, or you've recently bought into Shore Acres or Coquina Key and you're working through FEMA elevation rules before you can break ground. The phases are the same; the permit timeline and cost structure shift based on flood zone and historic district. We flag both throughout.
In This Article:
- Phase 1: Design — 3 to 6 Months
- Phase 2: Pre-Construction — 4 to 8 Weeks
- Phase 3: Permitting — 1 to 4 Months
- Phase 4: Construction — 5 to 6 Months
- Can You Live in Your Home During Construction?
- Communication: What to Expect From Your Contractor
- The Thing Nobody Warns You About: Project Fatigue
- Frequently Asked Questions
Phase 1: Design — 3 to 6 Months
Your project starts with an architect, not a contractor. For any structural addition, Pinellas County requires stamped plans with engineering. There's no skipping this step.
What happens during design:
- Architect selection. You'll want someone with real experience in St. Pete's building department and your neighborhood's specific regulations. Old Northeast or Historic Kenwood? Your architect needs to know the Historic Preservation Board and the Certificate of Appropriateness process. Snell Isle, Shore Acres, or Coquina Key? They need to understand FEMA compliance for flood zone additions — including the substantial-improvement 50% rule that decides whether you can add on at grade or have to elevate. The wrong architect adds months to your timeline. Pinellas County requires stamped engineering on any structural addition; there is no work-around.
- Schematic design. Your architect translates your wish list into actual drawings. Expect several rounds of revisions as your vision sharpens against the realities of your lot size, setbacks, and structural constraints.
- Budget conversations. This is where we get involved early — before your design is locked. A good contractor will review your plans and flag scope that will strain your budget before your architect puts pen to permit application. An architect who designs without knowing what construction costs is setting you up for a rude awakening.
- Permit drawings. Final stamped plans prepared for submission. Your surveyor may need to update your boundary survey if it's more than five years old.
How long design takes depends heavily on two things: your decisiveness and your architect's workload. Three months is realistic for straightforward projects. Six months happens when clients are still deciding between bump-out and second-story additions after month two.
Phase 2: Pre-Construction — 4 to 8 Weeks
This is the phase nobody talks about, and it's where your project either gets protected or gets into trouble.
Pre-construction is the window between “permit submitted” and “crews on site.” Most contractors skip it or treat it as a formality. We treat it as the most important work we do for your project.
Here's what happens during pre-construction:
Budget Sharpening
By the end of pre-construction, roughly 75% of your line items are confirmed at hard cost — bringing your overall budget to 90-95% certainty before crews arrive. As Jeremy puts it: “By the time we wrap up pre-construction and move into construction, roughly 75% of our line items will be confirmed absolutely on cost. That 75% really brings our budget up to about 90 to 95% of certainty.” That number matters on a $200,000-$400,000 project. We get there by running what we call pencil-sharpening rotations: structural line items come back with hard bids priced through our 20+ W-2 carpenters on payroll and our long-relationship trade partners, and finishes get sized via T&M allowances against real recent project data — not generic square-foot guesses.
Selections Coordination
Your flooring, tile, fixtures, and cabinetry need to be selected before construction starts — not in month three when crews are waiting. Our selections coordinator walks you through every choice on a set timeline. Making decisions early eliminates the most common source of mid-project delays and cost overruns.
The Field Walk
Before groundbreaking, your project manager, general superintendent, and on-site superintendent meet at your home with you. Everyone who touches your project is in the same room, reviewing plans together, identifying questions before they become problems in the field. This meeting is where your project goes from paper to reality.
Notice of Commencement filed. BuilderTrend portal opened. Your project is officially live in our system, with your budget, schedule, and communication channels set up and ready.
Phase 3: Permitting — 1 to 4 Months
Standard residential additions in St. Pete run 1-2 months for permit approval — the baseline for a $100,000-$500,000 addition in a standard zoning district. Your permit application covers everything a new build would: foundation, masonry, rebar, electrical, plumbing, roof, windows, doors, framing, insulation. Setback requirements get plotted on the survey before design starts — St. Pete typically requires 6-7 feet on the sides, 20-30 feet front, and 25 feet rear. Notice of Commencement gets filed with the building department once the permit issues.
Jeremy is direct about why experience matters here: “The St. Pete building department is known as being very difficult. It requires a contractor with significant experience and relationships inside that building department.”
What extends your permitting timeline:
- Flood zone properties (AE zone): Shore Acres, Snell Isle, Coquina Key, and other flood-prone areas require FEMA compliance review in addition to standard building review. Add 2-3 months to your baseline.
- Historic districts: Old Northeast, Historic Kenwood, and Roser Park additions require a Certificate of Appropriateness from the Historic Preservation Board before the building department will issue your permit. Add 2-4 months.
- Summer months: June through September, St. Pete's rainy season slows review times. Plan your permit submission timeline accordingly if you want to break ground before summer.
During permitting, your job is to stay patient and let your contractor manage the department. Calling to “check on status” rarely helps and sometimes creates delays. A contractor with established relationships knows when to push and when not to.
Phase 4: Construction — 5 to 6 Months
This is what you've been waiting for. Here's what actually happens, month by month:
Weeks 1-3: Demo, Site Prep, and Foundation
Work begins with demolition of whatever needs to come down, then excavation and forming for your new foundation. Footings get poured, inspected, and then you wait — concrete needs roughly seven days to cure before framing can start. Your first inspection happens here.
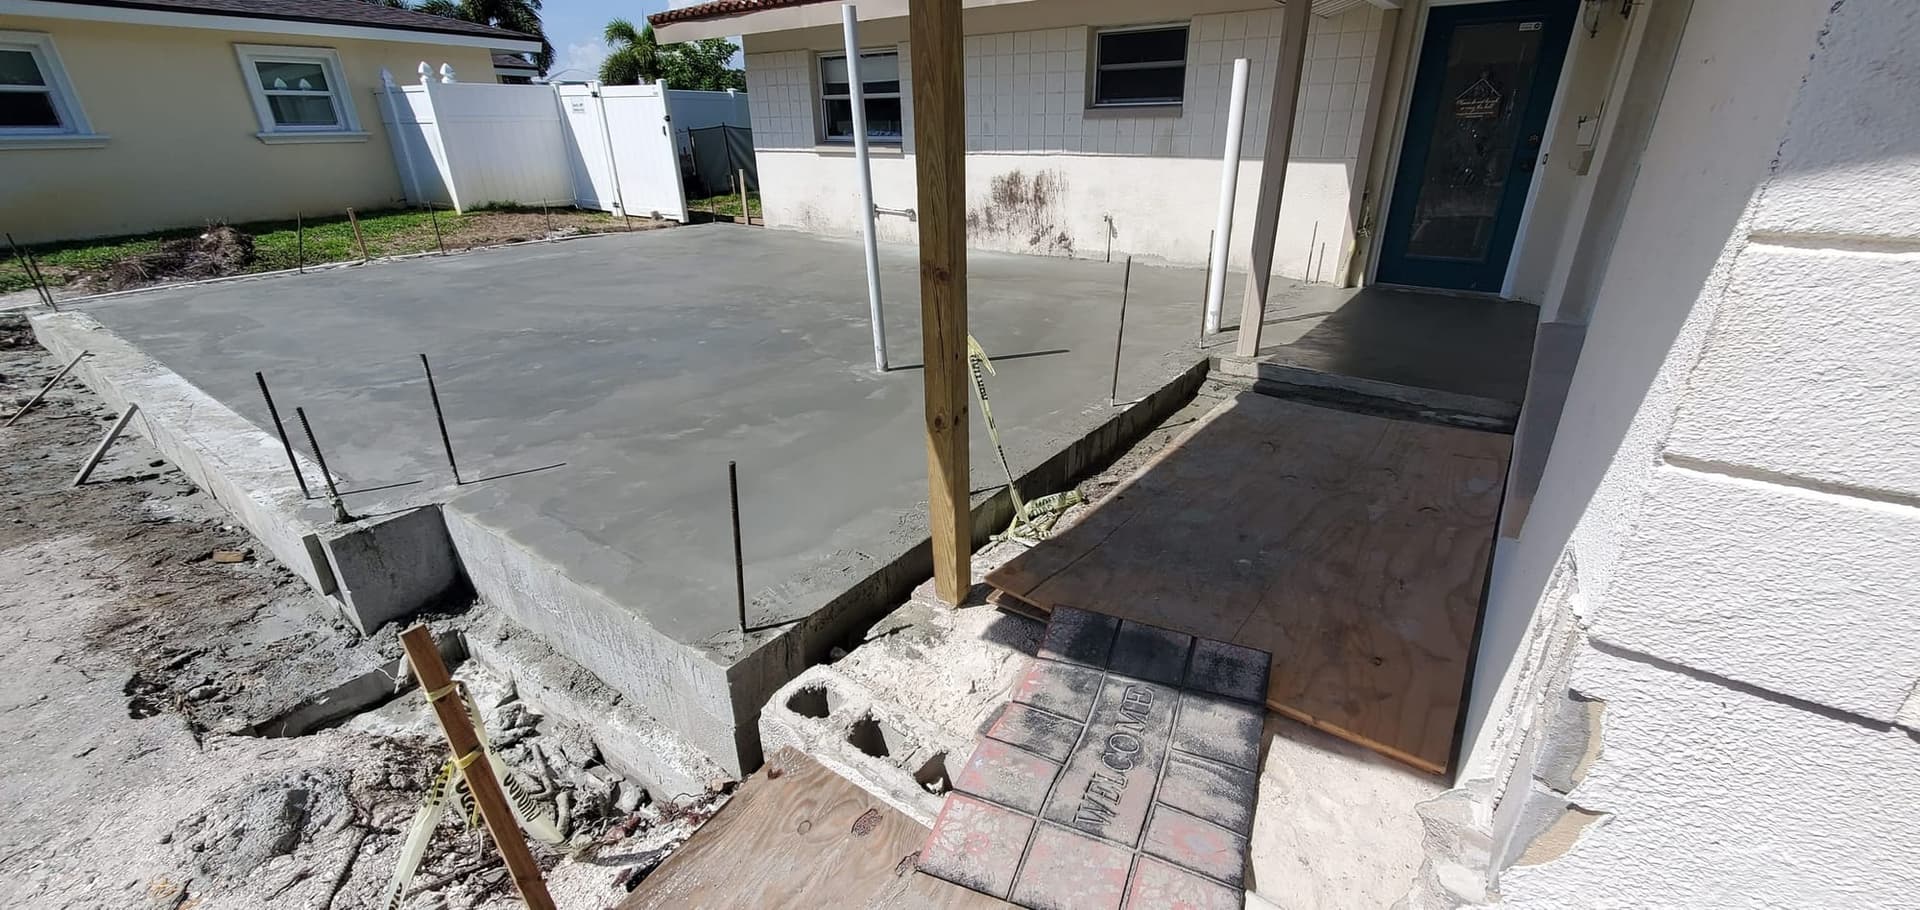
Foundation poured and curing before framing begins.
Weeks 3-5: Structural Tie-In and Framing
This is the most technically critical part of your entire project. The connection between your new addition and your existing home needs to be right. As Jeremy explains: “If it's masonry, we use epoxy and steel rebar to tie into poured cells; if wood, heavy-duty Simpson steel connections engineered for a solid joint.” Our in-house W-2 carpenters handle this work directly — not subcontractors who saw your jobsite for the first time that morning. The structural tie-in isn't the place for a crew you've never worked with before. The same applies to the HVAC retrofit that almost always follows: Florida SEER efficiency standards keep rising, so adding 600-900 sq ft to a 1990s system usually means a full HVAC swap, not just a duct extension — budget for it before drywall closes.
Once the tie-in is solid, framing goes up fast. This is the week most clients get excited — you can finally see the shape of what you've been designing for six months. The same structural process applies whether you're building a bedroom wing or a Florida room addition — proper tie-in is non-negotiable.
“Realistic cost per square foot in St. Pete is hard to pin down — it depends on wet space. A garage with two offices at about 2,000 sq ft, no wet rooms, ran around $200,000. If it had included a bath and kitchen, it would have been closer to $500,000. So roughly $200–$300 per sq ft for first-floor additions and $300–$400-plus for second floors. Building up versus out is the bigger lever — existing foundations and walls aren't built for a second story, so retrofitting can double the cost compared to building out.”
— Jeremy, Revolution Contractors (more in our home addition cost guide)
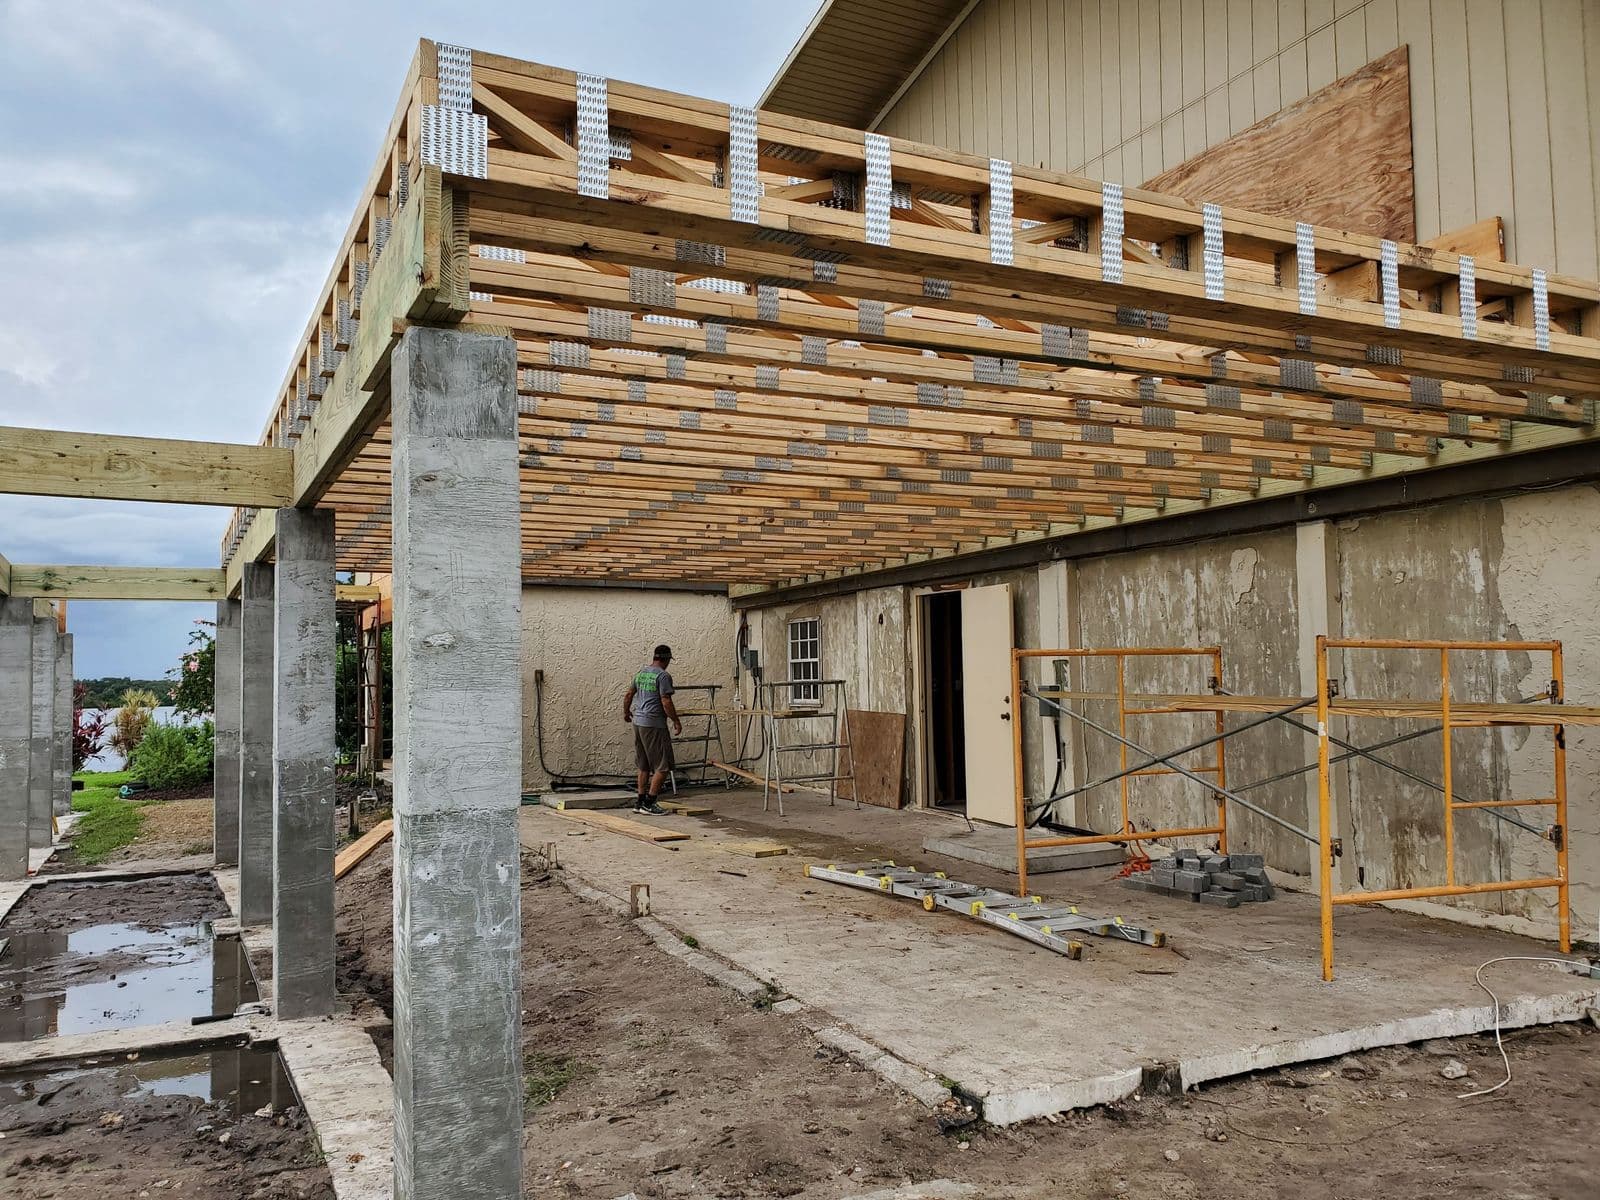
Framing and trusses take shape during the structural phase.
Weeks 5-6: Roof Framing and Sheathing
Matching the new roofline to your existing structure requires precision. Framing inspection happens before any roofing materials go on.
Weeks 6-8: Rough MEPs (Mechanical, Electrical, Plumbing)
Your electrician, plumber, and HVAC crew rough in their systems inside the open walls. All three trades need to coordinate — this is where scheduling your own subs can create weeks of delay. Our in-house administrative team runs this sequencing.
Week 8: Rough Inspections
All three mechanical trades get inspected before walls close. This inspection is non-negotiable and cannot be skipped or short-circuited.
Week 9: Insulation
Walls and ceiling get insulated, then inspected. Another inspection before drywall.
Weeks 9-11: Drywall
Fair warning: this phase will feel like the project has slowed to a crawl. It hasn't. Drywall is precision work — taping, mudding, and sanding takes time and can't be rushed without showing in the finished product. Your job during drywall phase is to not panic.
Weeks 10-12: Exterior Work (Runs Parallel)
Siding, trim, and exterior paint can proceed in parallel with interior drywall. Your addition starts looking like part of the house from the outside.
Weeks 12-15: Interior Finishes
Flooring, cabinetry, and interior trim installation. This is where your selections decisions from pre-construction pay off — everything you chose is ready to install, no waiting.
Weeks 14-16: Fixture Installation and HVAC Finals
Light fixtures, plumbing fixtures, HVAC final connections and balancing.
Week 16: Your 95% Walkthrough
You walk the project with your superintendent. You'll create a punch list together — a written list of everything that needs attention before final sign-off. First-time renovation clients are sometimes surprised by the punch list concept. It's not a sign that something went wrong. It's the standard quality control process that every responsible contractor uses.
Weeks 16-20: Punch List, Final Inspections, Certificate of Occupancy
Your punch list items get completed. All trades pull final inspections. The building department issues your Certificate of Occupancy (CO) — the official document confirming your addition meets code and is safe to occupy. As Jeremy puts it: “We often say major construction for five months and then move-in as we wrap up inspections, with a sixth month of punch-list work.”
Ready to Talk Through Your Addition Timeline?
Every home addition is different. Let's discuss your specific project, timeline, and budget.
Can You Live in Your Home During Construction?
Usually yes — at least during the structural phase. Here's how to think about it:
You can typically stay during: Foundation and framing work (the new space is being built away from your living areas). Rough MEPs. Even drywall in most cases.
Consider relocating during: The roof tie-in, when workers are opening your existing roof. Any phase where simultaneous interior remodeling creates continuous dust and noise throughout your living spaces. If your project combines an addition with a kitchen remodel, plan for some time off-site during kitchen demo and installation. Flood-zone projects in Shore Acres, Coquina Key, or Snell Isle that require house elevation are a separate case — if you're lifting the home as part of the addition, you'll be out for the entire 6-9 month construction window, not just the disruptive phases.
Rentals in St. Pete currently run $2,500-$4,000/month for a home comparable to what you're leaving. That's real money over a 6-month construction period. We keep clients in their homes as long as it's safely possible — both because it's more comfortable for you and because it's more economical.
Pets and children: be realistic. Construction sites are dusty, loud, and have open materials. If you have young children or animals, factor that into your relocation decision for the most intensive phases.
Communication: What to Expect From Your Contractor
Jeremy has said this in every context: “Any time that we've gotten into trouble, had a project go badly, had a relationship go badly with a client, the issues always can be traced directly back to communication.”
Here's what you should expect from your contractor on a $200,000-$500,000 project:
- Weekly budget reviews. You should see a line-by-line comparison of actuals against your budget every single week. Not a summary. Not “we're on track.” Real numbers, with variances called out and pending invoices flagged. This is how T&M (Time and Materials) billing works in your favor — you see exactly what's being spent, week by week, against the 90-95% certain budget you locked in pre-construction, instead of a lump-sum contract where overruns hide until the final invoice. Billing runs on a roughly biweekly cycle.
- BuilderTrend updates. Your project portal should have current photos, schedule updates, and open RFIs (requests for information) so you know what decisions are pending.
- A named superintendent. You should know who runs your project and be able to call or text them directly. Not a rotating cast of foremen, not a general office number.
- Proactive heads-up on problems. Unforeseen conditions happen on every addition — your existing framing may have rot, your foundation may need extra reinforcement, your HVAC system may need a full replacement to serve the new space. Your contractor should call you when something is found, explain the options, and give you a cost impact before doing the work. Surprises on your invoice mean your contractor's communication failed.
The Thing Nobody Warns You About: Project Fatigue
Around month eight or nine of your addition, something happens to almost every client. The excitement of the design phase is a memory. Permitting dragged. Construction has been going on for months. You're tired of making decisions, tired of dust, tired of the disruption. This is project fatigue, and it's real.
The best protection against it is a contractor who front-loads your decisions during pre-construction (so you're not making selections while crews wait), gives you clear phase milestones so you always know what's happening next week, and communicates proactively so your anxiety doesn't fill an information vacuum.
You'll still hit the wall. But knowing it's coming — and knowing your contractor has built a process around minimizing it — helps.
Frequently Asked Questions
How Long Does a Home Addition Take From Start to Finish?
Plan for 12-18 months total: 3-6 months of design with an architect, 1-2 months of permitting (longer in flood zones or historic districts), and roughly 6 months of construction. Jeremy summarizes it as “a few months of design, a few months of permitting, six months of construction” — that's the realistic picture for a structural addition in St. Pete.
Can I Live in My House During a Home Addition?
Usually yes, for most of the project. The structural phase (foundation, framing, framing tie-in) typically allows clients to stay. The phases most likely to require temporary relocation are roof tie-in (when existing roof is opened) and any concurrent interior demolition work. Rentals in St. Pete run $2,500-$4,000/month, so staying in place saves real money.
What Is the Pre-Construction Phase and Why Does It Matter?
Pre-construction is the 4-8 week window between permit submission and groundbreaking. It's where your budget gets sharpened (75% of line items locked to real numbers), your selections get finalized, and your project team walks the site together before anyone swings a hammer. Contractors who skip this phase are setting you up for mid-project surprises.
How Do I Know if My Contractor Is Communicating Enough?
You should receive a weekly budget report comparing actual spend against your estimate, BuilderTrend photo updates, and direct access to your superintendent's phone number. If your contractor's communication consists of “things are going well, don't worry” without numbers to back it up, that's a problem waiting to surface.
What's the Most Common Cause of Delays During a Home Addition?
Delayed selections. When clients haven't chosen their flooring, tile, or fixtures before construction starts, crews hit a wall waiting for materials. The second most common cause is permitting surprises — especially in flood zones or historic districts where additional reviews add months. A strong pre-construction phase eliminates the first problem entirely, and an experienced contractor builds the second into your timeline upfront.

The finished product: a completed addition ready for move-in.
Start With a Conversation
The 12-18 month timeline starts the moment you pick up the phone. If you're planning a home addition in St. Petersburg, the sooner you understand the process, the better positioned you are to manage it.
Talk to Revolution about your addition →
Related reading:
- Home Additions in St. Petersburg — Our Services
- What Does a Home Addition Cost in St. Pete? — the full economics breakdown
- Remodel, Add On, or Build New? — the decision framework before you commit
- How We Work — T&M, BuilderTrend, and Weekly Budget Reviews
- 9 Things to Consider When Hiring a Home Addition Contractor
- Pinellas County Flood Zone Guide